Post processing images - The final step to getting that awesome click

OP
izzikio_rage

izzikio_rage

Technomancer
No sooc image bands, just alternating layers of PPed jpeg and PPed raw. Just wanted to show how on extensive Post processing, raw gives better final image. Straight out of camera raw are useless and if that is what you want to use then makes sense to go for jpeg
 

sujoyp

Grand Master
Amlan can you provide me that jpeg out of the camera image ...I really want to see if the jpeg is that poor or is it poor post processing by you....just to confirm myself
 

Gen.Libeb

Padawan
To be fair I think izzikio_rage or someone needs to post a decent straight out of camera jpeg & the RAW file & then have TDF members post process them both to see if actually one of it can be better pped than the other.

From my experience, I haven't been able to get a better output from a RAW file then I 've from the jpeg.
On the other hand a post processed RAW file still needs to be saved as a jpeg & some more processing needs to be done on the jpeg (via layers) which can't be done on the RAW. Example - shot having a slightly blown out sky.
 
OP
izzikio_rage

izzikio_rage

Technomancer
Am pretty sure that there are ways to post process this image that would not bring out the flaws that the jpeg inherently has. This experiment was just to show that under the same post processing a raw will hold up much better than a jpeg.

But since I would love to have one of my images worked by an expert :)) attaching the jpeg file (resampled, sorry but my net connection is going mad these days).

P.S: someone please download this attachment within an hour, otherwise apparently it is deleted by the forum
 

Attachments

  • stone statues.jpg
    stone statues.jpg
    90.3 KB · Views: 97

Faun

Wahahaha~!
Staff member
Why would you save as jpeg after PPing RAW ? IMO makes sense to save as PNG.
 

nac

Aspiring Novelist
To be fair I think izzikio_rage or someone needs to post a decent straight out of camera jpeg & the RAW file & then have TDF members post process them both to see if actually one of it can be better pped than the other.
Good to know a like minded people... :D I thought of this few weeks ago, almost I was about to post it but finally thought it is not the time... It has to wait.

It should be your forte. It's been three weeks since this thread started I haven't seen a single tutorial/your PP work post. Come on, bhai... :)
 
OP
izzikio_rage

izzikio_rage

Technomancer
I'm very very surprised that you people actually want to read through my tutorial over all the amazing, very professional tutorials. Anyhow, here goes.

1. I usually copy paste the files into my photographs folder. I love my folder structure, plus this allows me to separate casual pics (family, friends, events) from the so called artistic ones. Usually casual pics are shot in jpeg while I am making an effort to shoot the more art oriented ones in Raw + jpeg

2. I do all my post processing in Lightroom and have picasa only for the purposes of indexing files. Picasa is awesome for sorting images by date and going through them quickly.

3. I have usually apply a set of keywords and copyright stuff during import. For copyright stuff, author name and email and all I've made a preset. Shown on the right under the "apply during import". This way these basic things get applied to all the images that I import.

*i.imgur.com/ufmurbW.jpg

4. Now comes the hard part, choosing which image you are going to waste time post processing :)) . If you have a bunch of similar images it helps to use the "compare tool" just hit "c" to use this. It allows you to compare two images side by side.

*i.imgur.com/YAYmwm2.jpg

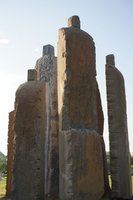
5. I usually start developing an image by moving the histogram. In this case I mostly pushed the "exposure" (the middle part of the histogram) toward to right to make the image brighter. This image requires a HDR so I also push in some of the details lost in the shadows and highlights.

6. I increase the temperature slightly to give it that orange sunset feel (people seem to find warmer tones more nostalgic and emotional). I also increase the clarity, vibrance and saturation, this adds quite a lot of pop to the image but has to be used with caution so that it does not make the image unnatural.

7. I also fix the any tilt of the image or crop out unwanted stuff using the cropping tool

*i.imgur.com/c9IYQYZ.jpg

8. next is the tone curve, I'm not really a fan of this unless you want some high contrast images (like black and white art shots). If that is the case I'll make it into an S shape, however for this image I've made the S very very slight.

*i.imgur.com/gQZ9hmX.jpg

9. HSL is another amazing tab that allows you to change the saturation or luminescence (brightness) on a color by color basis. Not touching it here but you can always increase the saturation of the orange.

*i.imgur.com/c9IYQYZ.jpg

10. Since I'm editing out a raw file I need to apply some amount of noise reduction, which is under the detail tab. Need to read up on what all these are I mostly end up applying the luminance noise reduction and at times the color one.

*i.imgur.com/IGxd5md.jpg

11. Finally, since the sony lenses have a large amount of distortion and vignetting (which jpeg automatically corrects) I apply the lens profile correction.

*i.imgur.com/AHaKoB2.jpg

12. voila! I tend to hit "y" multiple times during the process to compare the original and post processed images side by side.

*i.imgur.com/kn3vZb5.jpg

13. My final step is file>export where i resize it if needed and export this as a jpeg.

In case any of you want to post process and compare the Raw vs Jpeg file for this image you can get it here. Should be pretty useful if you just want to give my workflow a try.

Sunset pics for tutorial.zip - GigaSize.com: Host and Share your files
 
OP
izzikio_rage

izzikio_rage

Technomancer
I've attached the raw and the jpeg files from the tutorial image. Someone please try out the comparing raw and jpeg thing. Even i would love to know how it compares
 

Gen.Libeb

Padawan
I've attached the raw and the jpeg files from the tutorial image. Someone please try out the comparing raw and jpeg thing. Even i would love to know how it compares

If I have your permission, I will edit your jpeg image & post the steps & final image online.

btw do you keep those ARW file formats. what format do you finally save it to ?
Isn't there a universal format for RAW?
Don't have lightroom so still didn't manage to open it. May be I'll need some sort of convertor.

Why would you save as jpeg after PPing RAW ? IMO makes sense to save as PNG.

On saving jpeg at high options, I do not see any difference between both at 1920*1080.
 
Last edited:

sujoyp

Grand Master
I will try it after my office...yesterday I tried a RAW from my dslr and I felt its gives quit an accurate colors easily..where jpeg needs more processing ...will check amlan's raw
 

nac

Aspiring Novelist
Gen, You can use DNG converter and from there you can develop in PS.

Here is my attempt...
Left is PPed-JPEG and right is PPed-RAW

*img43.imageshack.us/img43/1790/ia44.png
 

sujoyp

Grand Master
*lh6.googleusercontent.com/-HK12aNn3-OI/UksQ3FqnuRI/AAAAAAAAJW0/ia1ACE-XLqo/w1028-h685-no/Desktop1.jpg

left side ones are PP-RAW and below original RAW
Right PP-JPEG and below original JPEG

Soo I have done the experiment and found RAW easier to edit and handle using Lightroom..I got the colors faster in post processing then JPEG...but file size is big a 3MB JPEG to a 14MB RAW is 5 times size increase
all lens issues like vignetting, distortions are visible and had to be removed manually

I have decided to try RAW in some of the photography type which dont involve huge number of files specially those tabletop photography
 

nac

Aspiring Novelist
Gen,
High quality original resolution RAW>TIFF is too big to upload (82MB). So I am uploading 1600px (long edge) image...

*www.filedropper.com/sunset
 
OP
izzikio_rage

izzikio_rage

Technomancer
If I have your permission, I will edit your jpeg image & post the steps & final image online.

btw do you keep those ARW file formats. what format do you finally save it to ?
Isn't there a universal format for RAW?
Don't have lightroom so still didn't manage to open it. May be I'll need some sort of convertor.

On saving jpeg at high options, I do not see any difference between both at 1920*1080.

Do give post processing these a try. It'll help the rest of us decide too what format we should be shooting in.

Raw files do not have a universal format, that is one of the greatest points against it. 20 years from now there is a high chance that I'll still be able to open and edit out the jpeg images that I have, perhaps in even better ways since the tech will have evolved. But support for my raw files will die the moment sony moves on to some other format for raw.

The other problem is that a universal format is just not possible. Raw by definition means that it's an almost direct data dump on what the sensor captured. bringing this to a universal set of rules would mean processing this in some way (which is what jpeg is for). So different sensor sizes, arrangements, and technologies will give you different types of data dumps which the camera saves as a raw file without touching it.

After all the processing I tend to save it as a full high quality jpeg (almost a 12 mb file itself, makes you wonder what all data you lost when the camera compressed the file to 3mb :))) I'm yet to start using png and tiff file formats for photos.

all lens issues like vignetting, distortions are visible and had to be removed manually

This atleast does not have to be done manually, you can use lens profiles to do this automatically even for lenses mounted via adapters and all. Most lens profiles are already a part of lightroom but incase you have one that is not available. You'll need to install Adobe air and then Adobe lens profile down loader (both are free on the adobe site). In that just search the name of your camera, lens and all and download the profile.
 
Top