Synology DS220+ Review [Nerevarine]

Nerevarine

Incarnate

Disclosure​

Even though I have been provided with a Synology NAS to review by Digit.in, my opinions are my own. I shall present this review to the best of my abilities detailing the aspects that I liked and areas of improvement for Synology to take into account.

Please note, the unit that came to me was DOA. I managed to send it to a service center, through Anorion and Digit personnel help. They managed to replace and ship it back to me. Even though this might be a rare case, I feel it is important to mention.

I have only provided description of the items, I am personally interested from this NAS. There are a lot more apps and services provided by the unit but they will not be mentioned in this review.

Overview​

The DS 220 + is one of Synology’s recent product launches in the entry level dual bay home NAS category. The device retails for around Rs 32,000 in amazon.in offering quite a unique combination of software and hardware in the entry level home NAS solution. If you want to invest in a capable NAS device, this is a decent solution.
 
Last edited:
OP
Nerevarine

Nerevarine

Incarnate

Hardware​

Contents​

The package comes with a Power adapter, 2 gigabit capable ethernet RJ45 cables and the NAS device itself. The powercable is a hefty 6 A variant, which is not common in Indian households (meant only for high power devices like ACs or Induction etc.). However since the power adapter uses standard PC 3 PIN power plugs, you can buy a regular PSU power cable and use it.

pic1-3.png

Drive Bays​

The device as mentioned earlier comes with 2 bays to accommodate 3.5 inch/2.5 inch hard drives or SSDs. The drive bays are capable of hot swap, meaning you can plug in hard drives or remove while it is powered on. However, I personally do not recommend doing this. The drives are attached by screwless plastic adapters. These are very sturdy and have rubber covering to prevent vibrations.

pic5.png

CPU and RAM​

The device is powered by an Intel Celeron J4025 with 2 GHZ Clock rate/2.9 GHZ Burst and 2 CPU Cores. It comes with 2 GB of DDR4 memory onboard and an additional open SO-DIMM slot to accommodate upgrades. As per Synology’s specification, It can only accommodate a max total of 6 GB of memory, which is a shame as the device is more than capable of running a lot of docker containers together (more on this later). For the purposes of the review, I shall use the factory configured 2 GB of RAM.

Note : Synology in their website, does not mention the form factor of the DD4 memory module, I only found out after opening the device. These are SO-DIMM module, (AKA Laptop RAM). Please be sure to purchase any additional module after checking the compatibility list in Synology’s website. Synology states that 3rd party memory module will void the warranty but this requires further clarification.

Network/USB​

The device contains 2 Ethernet RJ-45 jacks with full duplex 1 gbps bandwidth. Furthermore the 2 jacks can be plugged into the same router/switch that supports link aggregation to double the available network bandwidth. While this will not increase the read write speeds for a single user, this can help multiple users attain higher overall speeds, as network read write operations can go in independent NICs. Alternately, it can be used as a failover backup network connection.

The device comes with two USB 3.0 port. You can see the devices appearing the external devices tab in Control Panel. As per Synology’s specification, it supports the following formats : Btrfs, ext3, ext4, FAT32, exFAT, HFS Plus, and NTFS. For exfat devices, you need to purchase an extension from the Package control, as the patent is owned by Microsoft. Any other format or uninitialised devices have to be formatted first before mounting.

These USB mounted drives will automatically appear as usbshare in your file browser. You can obviously, set permission about which user may interact with drives. If you want to use your USB drives for applications like Docker or Moments, then it is very much possible.

You cannot use USB drives as a storage pool, like proper sata mounted drives. However for all intents and purposes, utilizing USB drives for software raid support is a bad idea. This is a difference between Openmediavault and DSM.

You can also share printers by plugging into the USB ports.

FRONT


pic2-2.png


pic3.png

Misc​

The device has an internal fan that acts as exhaust. It should be enough to cool the hard drives and the motherboard attached.

The indicator lights provide feedback which hdd/nics are in use. You may also customize the transparency of these leds and turn them down completely, if you don’t like them.

For my use case, I shall be using the Seagate Barracuda Compute drive provided for the review along with my own WD Purple Surveillance drive.

pic4.png

Hardware Impressions​

Overall, I’m very impressed with the build quality, It occupies a very small footprint and makes very little noise when the fan is set to quiet mode. The plastic housing makes it lightweight, and portable.

The toolless HDD installation is excellent, but I have doubts about the longevity of the rubber parts.

Embedded memory deteriorates eventually. I would have liked to see 2 SO-DIMM slots instead of 1, without the 2 GB being embedded, I believe older models had this option. I would have also liked to see an NVME or a Sata slot in which you can install DSM. In case of a hardware failure, this would ensure you could easily swap/reinstall.
 
Last edited:
OP
Nerevarine

Nerevarine

Incarnate

Software​

DSM Setup​

Synology’s NAS software is called DSM (DiskManager). The latest version according to this review for my unit is 6.2.4-25556.

After attaching an empty hard drive, the and connecting to your network, find the IP address of the Synology NAS using your DHCP Client list. It should appear as “Synology”, which can be renamed later. (You can see it’s named as NAS-STORAGE here). Alternately, you may use Synology Assistant to find it.

Router1.png


I highly recommend you set your router to assign a static IP to the Synology device using it’s MAC address. This ensures, this device will always take the same IP between different boots.

Router2.png


The first time you run the Synology NAS, you will be asked to install DSM. You need a HDD plugged in to install DSM. Give it a good 10-20 minutes and you will automatically boot into the main desktop window.

You will need to create your user account and should you wish, connect your Synology online account.

On the main dashboard, You are presented with a nice resource monitor widget which can be customized to your liking. It can provide information about HDD SMART status, HDD R/W Utilization, Network Utilization, Storage, Connected Users, Scheduled Logs, Logs.

DSM1.3.PNG


On the top left, main menu, you have access to all the Synology apps currently installed.

The DS220+ is capable of software RAID for data duplication, redundancy and faster io.

Here is a link that describes the different RAID configurations and their use cases.

RAID0, RAID1 and SHR are supported along with basic configuration which treats attached HDDs as independent volumes.

For the purposes of this review, I shall set it to basic (without RAID). I will explore RAID0, RAID1 and SHR in a future review.

The first order of business is to initialise your hard drive volume. Synology offers two very widely used file system formats for Storage. You may use the tried and tested EXT4 or a more modern BTRFS. This link explains the difference in some detail. I will provide more info later on.

DSM1.5.PNG


Note : Some HDDs are not compatible according to Synology. I was presented with this particular notification when I tried powering a WD Purple Drive.

DSM1.4.PNG


Once you have set your volumes correctly, you need to provide appropriate permissions for R/W access. your NAS unit is now ready for usage.

Notification​

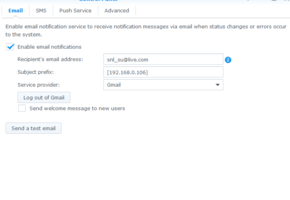
There is an option in the Control Panel -> Notification Tab to set up email, SMS or custom Push Notification utilizing Synology’s servers. I highly recommend having a dedicated email for sending these notifications.

Notification1.1.PNG


You can control what and when to notify based on a selection of options.

Notification1.2.PNG


HDD Monitoring and Log Center​

DSM is capable of regular HDD Smart status checks, providing period logs and providing external access if you have a capable network (More on this later).

HDD1.PNG


The Log center provides a detailed description of the events occurring in the NAS Unit.

Log1.1.PNG


You also have access to custom notifications, which you can configure based on keywords present in said logs. This is very nifty and is a solid approach to dealing with disasters like HDDs going kaput!
 

Attachments

  • Notification1.1.PNG
    Notification1.1.PNG
    14.5 KB · Views: 169
Last edited:
OP
Nerevarine

Nerevarine

Incarnate

Synology Drive​

Synology Drive is essentially a home-cloud solution, which lets you use your NAS unit as a cloud storage service. The purpose of this application is to provide a front end for outside your network. The interface should appear familiar to those who use Google Drive or Dropbox.

SynDrive1.1.PNG


You have an excellent selection of options, including managing folders, tagging folders and files, multi user sharing, link sharing (including private/public access) along with a nifty recycle bin.

SynDrive1.2.PNG


Overall, this is an amazing addition and converts your NAS into a proper cloud storage alternative.

If your ISP is under double-NAT and you only have ipv4, then direct port forwarding your Synology NAS to external access is not going to be possible. We can bypass it using SSH tunnelling, for which I shall provide a tutorial later on.

Security Advisor​

The Synology Security advisor can provide resolution to common problems related to misconfigured passwords, open network ports, updates and account. It also provides a nifty malware scan analysis tool that scans the files kept on your NAS based on some schedule.

SecAdvisor1.1.PNG


You have the option of generating reports on your NAS and getting it notified on a subscribed email. Nifty !
 
Last edited:
OP
Nerevarine

Nerevarine

Incarnate

Package Center​

Synology offers both first party and third party community made software packages to be installed onto the device. There are a wide range of applications, from mail servers, to Image viewers.

Packages1.1.PNG


I will go through some packages in their separate section. Overall the list is quite rich and the packages themselves are of very high quality, at least the first party ones.
 
Last edited:
OP
Nerevarine

Nerevarine

Incarnate

Docker​

Synology offers docker as a package control application. It is very well designed and you do not need to know the ins and outs of docker command line to use it.

Docker1.1.PNG


It offers some very nifty features like getting a dashboard with total cpu, memory consumption and the individual usage through containers.

Having the capability to run docker is a tremendous bonus for this device. Docker offers a way to run software under isolated subsystems called containers. They are similar to VMs but difference being, unlike VMs, in Containers, the hardware is never virtualized and you do not need a guest operating system.

Docker1.12.png


This lets us deploy software in an isolated environment, and if it creates any issues, can easily be removed. You can even deploy the same software, in multiple different containers. The concept of containers define the boundaries of the software.

There is a huge library of docker softwares you can fetch from dockerhub.

Docker1.2.PNG
Docker1.3.PNG


A guide to deploy a container via docker will be added later.
 

Attachments

  • Docker1.2.PNG
    Docker1.2.PNG
    92.5 KB · Views: 164
Last edited:
OP
Nerevarine

Nerevarine

Incarnate

Moments​

There are two picture viewers on this particular NAS unit. Moments and Photo Station.

Moments offers a lot of additional features, therefore it should be the default choice, if you own a DS220+.

Moments offers a way to synchronize the photos/videos on your phone as well as present a nice gallery UI for viewing Photos and videos. This is done if you install the Moments app on your phone and connect to the NAS.

Screenshot_20210619-215433.jpg


Furthermore, Moments has an AI powered backend that continuously classifies objects, people and subjects in the photos and sorts them into auto-generated albums. This is very similar to Google Photos and an amazing addition to this product. The AI also suggests improvement to your pics and tries to suggest deleting duplicate images to save storage space. Nifty !

Original

MomentsImproved0.PNG


Improved

MomentsImproved.PNG


Lastly the videos stored via moments automatically get transcoded to lower res formats, in case you would like to play these videos using a quality selector. I would disable this, if you are not interested, as it wastes CPU power and the transcode quality isn’t that impressive.

Moments1.2.PNG
 

Attachments

  • Moments1.2.PNG
    Moments1.2.PNG
    13.4 KB · Views: 158
  • MomentsImproved.PNG
    MomentsImproved.PNG
    1.3 MB · Views: 171
Last edited:
OP
Nerevarine

Nerevarine

Incarnate

Cloud Sync​

Synology offers a very impressive Cloud Sync utility that can be configured with all major cloud storage providers. This provides an additional data backup opportunity, if you already pay for a cloud storage solution.

CloudSync1.PNG


The Cloud Sync utility also provides a way to do one way syncs and ignore deletes on the NAS. This configuration is very useful if you just need a way to batch upload to Cloud and deletions on the NAS should not be reflected on the cloud drive.

CloudSync1.1.PNG


You can configure the cloud sync utility to operate based on specific time and schedule or leave it as is, i.e. always sync.

CloudSync1.2.PNG


For my use case, having the Cloud sync application to backup my data to my google drive was particularly important and Synology’s offering is absolutely top notch. Just a reminder, Google does not provide any cloud sync tool to natively run on linux, so we have to rely on open source alternatives like rclone, which is very difficult to configure for the first timer as it's all command line and cronjob based.

Synology’s offering, I believe is a fork of the opensource project rsync, but provides a very intuitive front end.
 
Last edited:
OP
Nerevarine

Nerevarine

Incarnate

What could be done better​

  • Kindly update the specification page in the website to mention the form factor of the RAM needed (SO-DIMM)
  • Provide NVME slot to install DSM, along with SO-DIMM RAM instead of directly embedding RAM. It is justified in the current cost of the device.
  • Synology DownloadStation API Breaking Change | Downloads cannot be added to Download Station · Issue #4388 · Sonarr/Sonarr :(
  • More to be added..
 
Last edited:
OP
Nerevarine

Nerevarine

Incarnate

Final Impressions​

It’s a very powerful device and Synology’s software support is top notch. Even though it is definitely possible to replicate this in a custom made NAS, with OpenMediaVault or FreeNAS, having a prebuilt offering with quality made materials and QA tested software applications is definitely a selling point. Although I feel the pricing is a little high, you pay for not only the hardware but the bug free software as well.

I am very happy with the Cloud Sync application, and I couldn’t ask for a better implementation.
Moments and Docker are also top notch implementations and deserve praise.

<This section is to be updated in the future>
 
Last edited:
OP
Nerevarine

Nerevarine

Incarnate

Bonus : Deploy Docker container (qBittorrent on Synology NAS)​

I will provide one example on how to deploy a container, its fairly straight forward and after you understand once, you can do it for any other.

First off, get the puid, and pgid of the user you created in Synology. The easiest way of doing this is via an ssh session.

SSH-1.1.png

Go to Terminal & SNMP in Control Panel.

SSH-1.2.png


Click on Enable SSH Service, leave the port as it is and click apply.

Next open a terminal application. If you are on windows, you may use Putty or cmder.

Login to the ssh session using the command

ssh <username>@<synology-ip-address>

You will be asked to enter password, enter it and press enter.

After you are logged in, type

id

This will return your uid, gid. Save this somewhere in your PC, as you will need this information.


Terminal.png


Also make sure to add your current User to the docker group using the following command

sudo synogroup --add docker <UserName>

Check that your user has been added in the DSM User UI (in control panel).

docker-recheck.PNG


Now, lets try to deploy a torrent downloader like qBittorrent through Docker. Synology already has a decent download utility called Download Station which I will take a look at later, but for this review/tutorial, we will go with qBittorrent.

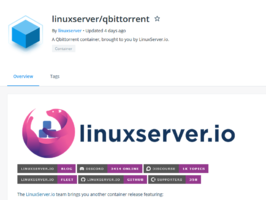
Go to dockerhub, Copy the link to qbittorrent docker page from linuxserver.

Open the docker application on Synology NAS, go to the Image tab and click Add and put the link as shown. Click Add and Docker will automatically fetch the app and store it as an Image.

Docker1.4.PNG

Refer to the docker page on what to set as Volumes, Environment Variables, Ports etc.

Docker1.6.PNG


After it is downloaded, you can launch the Image as a container.

Docker1.5.PNG


Click Advanced Settings and assign volume, environment variable and port based on the values defined there.

Docker1.7.PNG


Finally click apply and your container of qBittorrent is going to run on specified port. You may need to set up qBittorrent username and password.

The specific container can only save it’s downloads inside this particular download directory and it has no access beyond the scope of this folder. These container apps are also accessed via a specific port, which you must define during creation. This lets you open this application’s interface as a webapp via your browser, with your

<SynologyNAS IP Address>:<PORT>

Open it via any browser and voila ! you just deployed your first docker container.

docker-qb.PNG
 
Last edited:
OP
Nerevarine

Nerevarine

Incarnate

Accessibility outside network​

In on of my earlier statements about the product, I was speculating whether Synology offered a tunnelling service which lets us bypass NAT restrictions and access the drive outside own network. This is false, as the supposed use case of QuickConnect ID is to map a easily remembered identifier to your non NAT restricted IPV4/IPV6 address. Essentially its the same functionality as a DDNS provider.

Synology DSM by itself does not have capability to tunnel out of double NAT restriction.


A correction, the quickconnect feature of Synology DSMs do have the capability to bring the first party apps like Moments, Synology Cloud to the web, and accessible outside of network.

The same is not true for 3rd party apps that you install via docker. I'm still exploring, will update what I find.
 
Last edited:

Cool Buddy

Wise Old Owl
One other advantage of Docker is it isolates applications from system dependencies as well. So, for instance, an application which was running in DSM 6.2 will not stop working on upgrading to DSM 7.0. This makes it advantageous for users to use Docker even for packages which are available directly.
I had Transmission installed, but it hasn't been updated for DSM 7.0. So it stopped working after the update. I then had to switch to Transmission on Docker, which worked falwlessly even on DSM 7.0.
Having Docker capability is awesome, and the best part is that in DSM, it's a completely GUI based solution and due to Synology's popularity, guides are available for all major applications, if you run into any issues.
 
Top Bottom