First of all, thanks to Synology in collaboration with Digit magazine for providing me an opportunity to get my hands on a Synology NAS for review. The review below is based solely on my own experience & not to be taken as a definitive conclusion.
A few weeks ago I received Synology DS120j & a seagate 1TB 7200rpm hdd. This was my first time actually using a NAS though I have read quite a lot about NAS earlier because of my interest in networking field & I have always wanted to test a Synology NAS which is generally considered as the best NAS money can buy.
So what exactly is a NAS. It is network attached storage which in simpler terms means it is basically a mini-PC running an operating system to which you can attach hard disk(one or multiple depending on no. of bays in NAS model) & then can connect to it via various means over lan & internet. Its main use is to save space & electricity consumption by replacing the need to run a full fledged PC system which can also achieve same objective of accessing your data over lan & internet albeit at a cost of installing & configuring various software running 24*7.
Coming to the NAS, I received DS120j in a properly packed box & received HDD in a separate package.
Pics of DS120j unboxing:


Nitpick 1: While initially installing the hdd in NAS I found out that only 4 out of 6 screws were required so I assumed the remaining 2 screws must be for the NAS unit back panel. Soon though I found out that was not the case & then I remembered another small pouch with 2 thin screws in it which turned out to be the correct screws for the unit back panel. A small suggestion to Synology here to please label the pouch containing the HDD screws as HDD/disk screws.
Setting up the unit(Ethernet mode):
Now here is one thing which many of us might be quite familiar with. Usually the wireless router in home is located in an area where it isn't possible to place a NAS alongside it for fear of knocking down of unit by childrens or pets. In my case the wifi router was located at a small shelf in the corner of another room where there is no space to place a NAS safely. For me the best location to place NAS was on my PC table which also meant that for the first time setup of NAS I ended up connecting the unit directly to my PC via ethernet/lan.
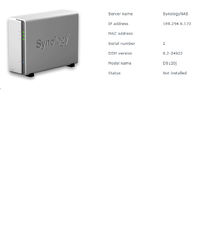
As I wanted to setup the unit first I ended up downloading the latest DSM(Disk Station Manager, the default operating system for Synology NAS units) version from Synology site on my PC. Then I just needed to open the "find.synology.com" in web browser & then proceeded to install the downloaded DSM file as per onscreen instruction which are quite simple to follow. The installation was done in around 10 minutes after which the NAS unit was up & running.


Above info regarding privacy policy looks a bit concerning considering usage of the words "browsing history" so requesting Synology to clarify this in an otherwise fine privacy policy.


Now came the most important part, to get internet connectivity on my NAS unit. Had the NAS been connected to my wifi router it would have been a piece of cake but alas my case was different. Despite my somewhat good knowledge about networking I ended up spending around 1 hour to finally figure out how to bridge my desktop internet connection over usb wifi dongle to my desktop ethernet connection to NAS unit.
Nitpick 2: Synology should incl(in DSM help section) or provide a small tutorial on their website to setup bridge connection for such scenarios where NAS unit is connected via ethernet to a desktop/laptop instead of a router.
After getting the internet connectivity on NAS I started installing the packages(or apps if you like) which were offered by default after the install of DSM while setting up the unit. I did however noticed the processor struggling a bit while installing the apps but other than maybe an extra minute or two of delay it was alright. I started testing by uploading a file via File Station app to test transfer speeds over ethernet.


Max speeds achieved over ethernet was around 54MB/s which is slower than expected considering a 7200rpm HDD most likely because of processor struggling as evident in above pics.
A few weeks ago I received Synology DS120j & a seagate 1TB 7200rpm hdd. This was my first time actually using a NAS though I have read quite a lot about NAS earlier because of my interest in networking field & I have always wanted to test a Synology NAS which is generally considered as the best NAS money can buy.
So what exactly is a NAS. It is network attached storage which in simpler terms means it is basically a mini-PC running an operating system to which you can attach hard disk(one or multiple depending on no. of bays in NAS model) & then can connect to it via various means over lan & internet. Its main use is to save space & electricity consumption by replacing the need to run a full fledged PC system which can also achieve same objective of accessing your data over lan & internet albeit at a cost of installing & configuring various software running 24*7.
Coming to the NAS, I received DS120j in a properly packed box & received HDD in a separate package.
Pics of DS120j unboxing:
Nitpick 1: While initially installing the hdd in NAS I found out that only 4 out of 6 screws were required so I assumed the remaining 2 screws must be for the NAS unit back panel. Soon though I found out that was not the case & then I remembered another small pouch with 2 thin screws in it which turned out to be the correct screws for the unit back panel. A small suggestion to Synology here to please label the pouch containing the HDD screws as HDD/disk screws.
Setting up the unit(Ethernet mode):
Now here is one thing which many of us might be quite familiar with. Usually the wireless router in home is located in an area where it isn't possible to place a NAS alongside it for fear of knocking down of unit by childrens or pets. In my case the wifi router was located at a small shelf in the corner of another room where there is no space to place a NAS safely. For me the best location to place NAS was on my PC table which also meant that for the first time setup of NAS I ended up connecting the unit directly to my PC via ethernet/lan.
As I wanted to setup the unit first I ended up downloading the latest DSM(Disk Station Manager, the default operating system for Synology NAS units) version from Synology site on my PC. Then I just needed to open the "find.synology.com" in web browser & then proceeded to install the downloaded DSM file as per onscreen instruction which are quite simple to follow. The installation was done in around 10 minutes after which the NAS unit was up & running.
Above info regarding privacy policy looks a bit concerning considering usage of the words "browsing history" so requesting Synology to clarify this in an otherwise fine privacy policy.
Now came the most important part, to get internet connectivity on my NAS unit. Had the NAS been connected to my wifi router it would have been a piece of cake but alas my case was different. Despite my somewhat good knowledge about networking I ended up spending around 1 hour to finally figure out how to bridge my desktop internet connection over usb wifi dongle to my desktop ethernet connection to NAS unit.
Nitpick 2: Synology should incl(in DSM help section) or provide a small tutorial on their website to setup bridge connection for such scenarios where NAS unit is connected via ethernet to a desktop/laptop instead of a router.
After getting the internet connectivity on NAS I started installing the packages(or apps if you like) which were offered by default after the install of DSM while setting up the unit. I did however noticed the processor struggling a bit while installing the apps but other than maybe an extra minute or two of delay it was alright. I started testing by uploading a file via File Station app to test transfer speeds over ethernet.
Max speeds achieved over ethernet was around 54MB/s which is slower than expected considering a 7200rpm HDD most likely because of processor struggling as evident in above pics.
Attachments
Last edited:
")
